If there’s one thing I’m passionate about it’s saving money and a big part of that is not wasting food. Learning how to make your own beef stock (or lamb, chicken or turkey stock) is one of the easiest ways to not only save money by using food you would otherwise throw away, but you’ll end up with a far superior, all-natural product than the cans you buy at the store. Fabulous!
Technically all you really need for stock is bones and water. I keep a gallon size bag of bones in the freezer, one labeled beef/lamb and a separate bag labeled poultry. Since you’ll never have enough bones after one meal to make stock, saving them in the freezer allows you to build up your supply. You’ll only want to save the bones from meals that didn’t use a heavy sauce such as barbecue sauce as that will flavor your stock. Bones from steaks or roasts work great and rotisserie chicken is perfect for your poultry bag. When you have enough bones stored up in the freezer (two full gallon bags is about right) you’re ready to make stock. Don’t worry that these bones have been chewed on. You’re going to cook this stock for so long that any germs won’t stand a chance.
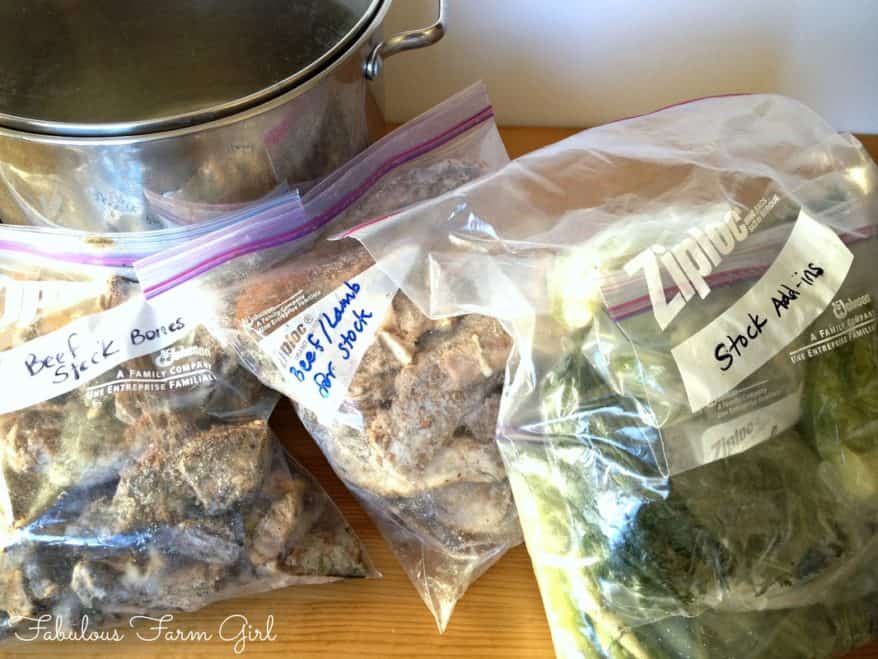
To make your stock more delicious you’ll also want to throw in some vegetables. I find that this is a great way to use up vegetable ends. Celery tops, leek tops, carrot tops, fennel tops, onion tops or leftover green onions all work great and whenever I have some I just throw them in a bag in the freezer labelled stock add-ins. That way I always have a place to keep the scraps of veggies, even when I’m not making stock that day. A few handfuls of the frozen veggie scraps thrown into the stock pot and your good to go.

All you have to do is put the frozen bones into a good sized stock pot, add a few handfuls of your frozen veggie scraps plus an onion or any veggies in your fridge that are maybe a little past their prime. It’s really up to you what you put in and you really can’t go wrong. I add some whole peppercorns and a little salt but no other herbs since I don’t know what recipe I’ll be using the stock in. Feel free to add fresh herbs or a bay leaf if you want to.
You’ll also want to add some apple cider vinegar because it will help leach the gelatin, minerals and nutrients out of the bones. This is a big part of what makes homemade stock so much healthier and tastier than store-bought. You really can’t taste the vinegar when your done and all the extraction caused by the vinegar makes a more flavorful stock.
Fill the pot with cold water to submerge the bones, cover and simmer for 12-24 hours. Cooking low and slow will ensure that you fully extract the nutrients in and around the bones.
Once the cooking is done, let the pot cool for about 2 hours. Pull out the large bones and then strain the stock through a colander, pressing down on the veggies with a wooden spoon to release extra juice. Strain again with a sieve or cheesecloth. Transfer to the fridge and let sit overnight.
Once stock is cold there will be a layer of fat on top that is solid and easy to remove. Then you can put the stock back in the fridge if you plan on using it fresh.
Food Safety Tip: according to the website www.foodsafety.gov, stock left in the fridge needs to be used within 4 days.
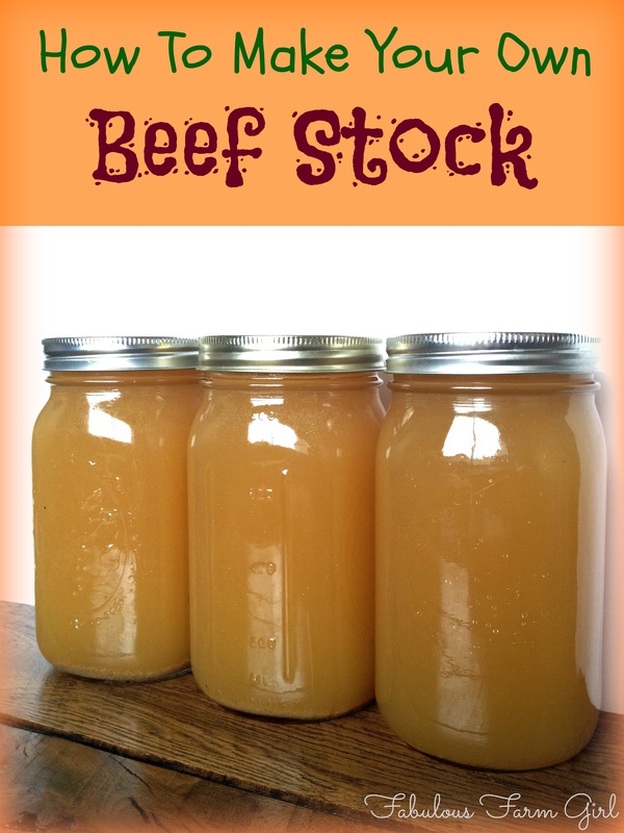
You can also pressure can it in pint or quart size mason jars. Or you can freeze it flat on cookie sheets which is what I usually do. Take the extra time to measure how much you’re putting in the bags and write that on the outside. That way you can grab a bag with the right number of cups of stock for your recipe. Include the date and use within six months.
I love the sight of homemade stock stacked up in my freezer or bottles of it lining my pantry shelves. Not only is it practically free to make but it tastes delicious and has tons of health benefits. You might want to consider replacing your current hot beverage with a steaming cup of broth. Yum!
How To Make Beef Stock
2 gallon size bags of frozen bones
1-2 cups veggie scraps either frozen or fresh
1/4 cup apple cider vinegar
1 tsp. peppercorns
salt to taste (tip: don’t use a lot of salt at this stage, since you can always add it later to the stock or to any recipe you’re making)
fresh or frozen herbs of your choice (if desired)
1. Place frozen bones in a large stock pot and cover with water. Add remaining ingredients. Over high heat, bring pot to a boil. Turn heat down to low, cover pot and simmer for 12-24 hours.
2. One stock has finished cooking, remove from heat and let cool for up to 2 hours.
3. Remove large bones and slowly strain through a colander, pressing down on veggies with a spoon to release liquid.
4. Strain a second time through a colander or cheesecloth.
5. Place stock into fridge until completely cooled.
6. Carefully remove solidified fat, saving if desired.
7. Store stock in fridge for up to 4 days.
8. Place stock in mason jars, and pressure can bottles using proper canning techniques.
9. Or pour into Ziploc bags and freeze flat on a cookie sheet. Be sure to label with the type of stock, the date and the volume in cups. Use within 6 months.
- 2 gallon size bags of frozen bones
- 1-2 cups veggie scraps either frozen or fresh
- 1/4 cup apple cider vinegar
- 1 tsp. peppercorns
- salt to-taste (tip: use sparingly until end)
- fresh or frozen herbs of your choice (if desired)
- Place frozen bones in a large stock pot and cover with water. Add remaining ingredients. Over high heat, bring pot to a boil. Turn heat down to low, cover pot and simmer for 12-24 hours.
- One stock has finished cooking, remove from heat and let cool for up to 2 hours.
- Remove large bones and slowly strain through a colander, pressing down on veggies with a spoon to release liquid.
- Strain a second time through a colander or cheesecloth.
- Place stock into fridge until completely cooled.
- Carefully remove solidified fat, saving if desired.
- Store stock in fridge for up to 4 days.
- Place stock in mason jars, and pressure can bottles using proper canning techniques.
- Or pour into Ziploc bags and freeze flat on a cookie sheet. Be sure to label with the type of stock, the date and the volume in cups.
- Use within 6 months.
karen says
Great tips, I love making my own chicken and beef stock…so good for our bodies and saves money. Stopping by from #SITSSAturdaySharefest
Leah says
Thanks Karen and I totally agree. I’ve been making it for years but it has recently become the newest health. Glad more people are finding out what we’ve known for a while. Thanks for stopping by and have a great week!
–Leah
Yvonne Chase says
Hi there,
A naturopath doctor suggested drinking a hot cup of beef stock daily. Said the benefits are great. You agree with him. Why? What’s so great about beef stock?
Stopping by from SITS…
Carolyn says
If you roast (brown) the beef or veal bones at 400-450* for about 45 minutes, the flavour of your stock will be greatly enhanced. I’d do lamb separately as the flavour can be pretty strong. I’d use for lamb curries, stews and tagines. Im new to the EO world and your site is invaluable!
P. S. My eternal gratitudes for poo brew
Judy says
Besides canning my veggies, broth is my favorite thing to can and use. i do mainly poultry and beef but have done just veggie broth. We bought a 1/4 beef to put into our freezer in the fall and they gave us all the “soup bones” we wanted. So I have enjoyed making broth. I use my waterbath canner to cook my broth for about 18-24+hrs and they after dipping out the larger veggies/pieces, I strain 2x. I usually get 18-20 qts. Then while I am washing up my pots/utensils, I crank up my pressure canner! I’m usually working from a wheelchair so it is a difficult 2-3 days, but sure do love the results.! A doctor once told me that using chicken broth, especially, was so great if you are having any gut issues. He said chicken soup was great but homemade chicken broth was even better!